Why is Windows Indexing Paused?
There are many reasons why the indexing could be paused, and it may not be a glitch. Below are some of the reasons that could have caused the problem.
Low BatteryDisabled ServiceCorrupt Index DatabaseSystem File CorruptionConflict with Outlook IndexingWindows Update
Most of these can be fixed, and if nothing else works, you can always use system tools to replace corrupt files.
Search Indexing has been temporarily paused
Follow these suggestions if you see a message Indexing has been temporarily paused in Windows 11/10 Settings: You will need an admin account for most of the suggestions.
1] Run the Search and Indexing Troubleshooter
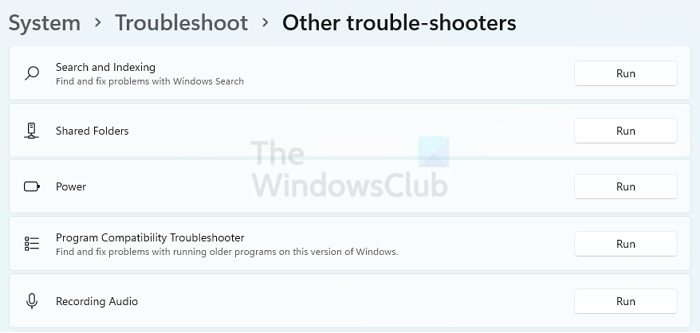
Open Windows Settings using Win + INavigate to System > Troubleshoot > Other TroubleshootersLocate Search and Indexing Troubleshooter and click on the Run button.Let the wizard complete the process and check if the issue is resolved
The troubleshooter will run a few scripts that can fix some of the known or often occurring issues, and if it’s one of them, you should see the problem resolved.
2] Restart Windows Search Service
Most of the processes are built as services in Windows. If the service doesn’t work, the feature will also stop working.
Open the Run prompt using Win + RType services.msc and press the Enter keyIn the Services window, locate Windows SearchDouble click to open itIf the process is stopped, then click on the Start buttonAlso, make sure the Startup type is set to Automatic (Delayed Start)
While here, also ensure that the following Windows Services are running and not disabled:
Background Tasks Infrastructure ServiceRemote procedure Call (RPC)
Restart the PC and check if the issue persists
3] Switch to Classic search
There are two types of searches on Windows 11/10 PC – Classic and Enhanced. As they define, the Enhanced search works quite differently than Classic. Therefore, if the Enhanced search is not working or giving problems, you can opt for Classic and vice versa. To switch the Find my files setting in Windows 11/10, do the following:
Press Win+I to open Windows Settings.Go to Privacy & security > Searching Windows.Find the Find my files section.Switch to Classic or Enhanced.
Then, restart your computer and check if you still have the problem or not.
4] Change Group Policy setting
There is a Group Policy setting, which might be responsible for this error. However, it is mainly for laptop users. To verify that, do the following:
Press Win+R to open the Run prompt.Type gpedit.msc and hit the Enter button.Navigate to Computer Configuration > Administrative Templates > Windows Components > Search.Double-click on the Prevent indexing when running on battery power to conserve energy setting.Choose the Not Configured option.Click the OK button.
5] Change Registry setting
The same aforementioned setting is available in the Registry Editor as well. To check that, follow these steps: Press Win+R to open the Run dialog. Type regedit > press the Enter button > click the Yes option. Navigate to this path: Right-click on PreventIndexOnBattery REG_DWORD value. Select the Delete button. Click the Yes button. Then, restart your PC and check if the problem is resolved or not.
6] Rebuild Search Index
Another way to fix this issue is to rebuild the search index from the ground. Windows offers this as an option which you can start by following the steps below:
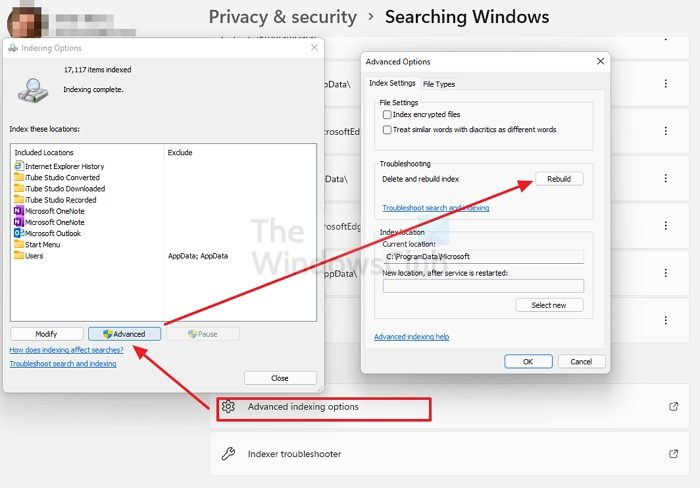
Open Windows Settings (Win + I)Navigate to Privacy & security > Searching WindowsScroll down and click on Advanced indexing optionsClick on the Advanced button to open a new windowClick on Rebuild and wait for the process to completeVerify if the issue is resolved.
7] Disable Indexing on Low Battery
When your laptop is on battery, most background services are stopped. If that is the case, you can simply plug in the laptop and start working again. However, if you want to keep it running, you can change the settings.
Open Settings using Win + IGo to Privacy & Security > Searching WindowsToggle off Respect power settings when indexing
The change should kickstart indexing even when on battery.
8] Remove Outlook Files from indexing
Sometimes, the Outlook indexing issue causes the problem, and hence skipping the Outlook files from Windows indexing can fix the problem.
Go to Windows Settings > Privacy & security > Searching Windows > Advanced indexing optionsClick on the Advanced button to open the Advanced Options windowSwitch to the File Types tab, and locate the PST file extension in the listPlease uncheck the box next to it, and click on the Ok button to apply the changes
Re-run the Windows Index Troubleshooter and see if the issue is resolved.
9] Delete Files inside the TxR folder
Sometimes files created by specific applications can also cause the problem. One such known is the TxR folder which contains files with TXR extension. It belongs to Corel Graphics by Corel. To delete files inside it, go to C:\Windows\System32\config\TxR and delete everything inside it. You will need admin permission to access the folder and delete the files. If you face any issues, you can go into Safe Mode and delete the files. This mode ensures only minimal services run in Windows, and nothing else is blocking it.
10] Run System Restore
If nothing else has sorted your problem, we are now coming down to the last measures. System Restore is known to fix issues by restoring them to a date where everything was working.
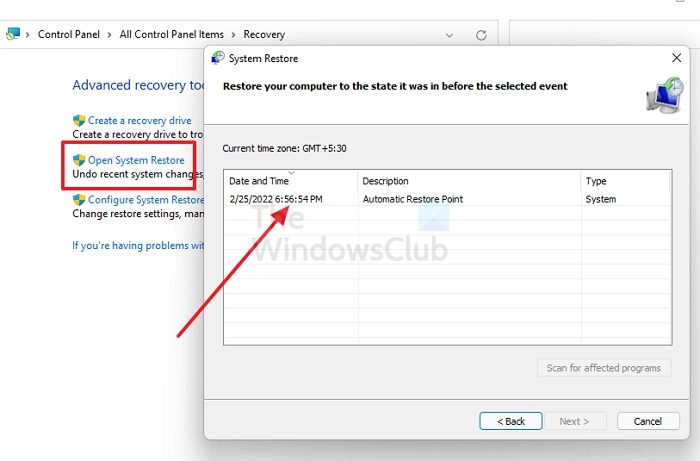
Open Windows Search using Win + SType System Restore and click on Recovery from the resultFrom the Recovery window, click on Open System Restore linkFollow the wizard, select a date that works, and choose to restore.
11] DISM & SFC Scans
Next on the list are the DISM and SFC tools that can help you fix corrupt system files. If Windows Search or any of its files have gone corrupt, DISM and SFC scans can fix the problem. Follow the guide on SFC and DISM to find out how to run and fix the problem. Both the tools work differently, and hence make sure to use them properly. I hope the post was easy to follow, and you were able to fix the error Windows Indexing is Paused if you were still not able to solve the issue, it’s best to contact Microsoft Support to get more help. More here: Troubleshoot and fix Windows Search or Search Indexer not working
How do I restart indexing in Windows 11?
To restart Windows Search Indexing in Windows 11/10, you can use the Task Manager. As it is a background process, you can restart this service from the Details tab in the Task Manager. To get started, press Ctrl+Shift+Esc to open the Task Manager and go to the Details tab. Then, find the SearchIndexer.exe process and click the End task button.
How long does it take to rebuild Index Windows?
If you have chosen to index only the metadata, it should be a few minutes. However, if the indexing is set to read the content inside of the document, then it will take even longer. Another factor that adds to the time is the number of files on your PC. Read: Search Indexer High Disk or CPU usage
What happens if I disable indexing?
Search results will take longer to display the result, and it will happen every time you search. Windows search service uses the old way to find the files without indexing.
How do I restart paused indexing in Windows 11/10?
To restart the paused indexing in Windows 11/10, you need to follow the aforementioned guides one after one. That said, you can try the troubleshooting by using the corresponding Troubleshooter. Next, you can toggle between Classic and Enhanced search. On the other hand, you need to verify the Group Policy setting, Registry Editor setting, etc.