How to prevent users from setting personal site as default location in Office
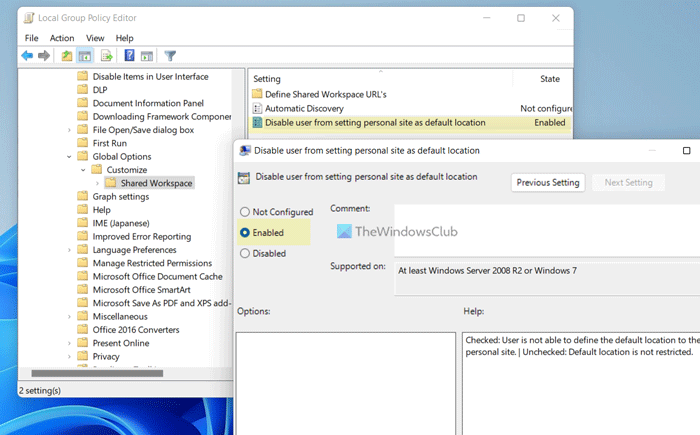
To prevent users from setting personal site as the default location in Office apps, follow these steps: To learn more about these steps, continue reading. To get started, you must open the Local Group Policy Editor on your computer. For that, you can search for gpedit.msc in the Taskbar search box and click on the individual search result. Once it is opened on your computer, navigate to the following path: User Configuration > Administrative Templates > Microsoft Office 2016 > Global Options > Customize > Shared Workspace Here you can find a setting named Disable user from setting personal site as default location. You need to double-click on this setting and choose the Enabled option.
Click the OK button to save the change and restart the Office apps to apply the change. Note: If you want to allow users to set a personal site as the default location in Office apps, you need to open the same setting and choose the Not Configured option. Alternatively, you can also select the Disabled option as well.
Allow or block users from setting personal site as default location in Office apps
To allow or block users from setting personal site as the default location in Office apps, follow these steps: Let’s check out these steps in detail. First, press Win+R > type regedit > click the OK button, and click the Yes button to open the Registry Editor on your computer. Once the Registry Editor is opened, navigate to this path: Right-click on 16.0 > New > Key and name it as common.
Then, repeat the same steps to create a key under common and set the name as portal. Following that, right-click on portal > New > DWORD (32-bit) Value and call it disablesetpersonalsite.
Double-click on the disablesetpersonalsite and set the Value data as 1.
Click the OK button to save the change. Finally, restart your computer. Note: If you want to revert to the original setting, you need to delete the REG_DWORD value. For that, right-click on the disablesetpersonalsite and select the Delete option. Finally, click the Yes button.
How do I change the default save location in Office 365?
To change the default save location in Office 365, you need to open the Options panel first. Then, go to the Save tab and find the Default local file location setting. Following that, click the Browse button and choose a location you want to set as the default one. Finally, click the OK button to save the change.
How do I block OneDrive from within Microsoft 365 apps?
To OneDrive from within Microsoft 365 apps, you need to use the Local Group Policy Editor. For that, go to Microsoft Office 2016 > Miscellaneous and double-click on the Show OneDrive Sign In setting. Then, choose the Disabled option. Lastly, click the OK button. That’s all! Hope this guide helped. Read: How to collapse the Ribbon automatically in Word, Excel, PowerPoint.

